| Back Home -> Back to Project Index -> Back to APRS Index | http://graham.auld.me.uk |
This guide is based on information gleaned from the AX25-HOWTO available in many places on the internet, originally written by Jeff Tranter, VE3ICH. The latest release I located was v2.0 from the 19th of September 2001. This guide is intended to update the information found there based on my experiences with setting up a Fedora Core 6 System in January 2007 to operate as an APRS station.
The AX.25 protocol offers both connected and connectionless modes of operation, it's used either by itself for point to point links, or to carry other protocols such as TCP/IP or NET/ROM.
AX.25 is similar to X.25 level 2 structure with extensions to make it more useful for amateur radio and alone is sufficient for operating an APRS system.
The Linux kernel supports KISS, 6PACK, SCC based TNC's plus a few others. The Soundmodem support (using a sound card as a modem) has been removed from the kernel and now exists as user-mode software which should work with any sound card supported under Linux.
Once you have set up kernel AX.25 support and configured your TNC or Soundmodem you are free to pick from a whole host of programs for APRS work, you will find the vast majority of these running on Linux will interface with the AX.25 stack.
Simplified Protocol Layering Diagram
_____________________________________________ | | | | | | AF_AX25 | AF_NETROM | AF_INET | AF_ROSE | |=========|===========|=============|=========| | | | | | | | | TCP/IP | | | | |________ | | | | NET/ROM | | ROSE | | |____________________|____|_________| | AX.25 | |_____________________________________________| |
The diagram illustrates that NET/ROM, TCP/IP and ROSE will all run on top of an AX.25 connection although AX.25 can be used directly without the other protocols, AX.25 configuration is however required before you can properly attempt to use other protocols on top.
Software Module Diagram of Linux Network Implementation___________________________________________________________________________________________ | | | || | || | | User | Programs | call node || Daemons | ax25d mheardd || Soundmodem | | | | pms mheard || | inetd netromd || | |_________|___________|_______________________||__________|_________________|| User | | | Sockets |open(), close(), listen(), read(), write(), connect()|| Mode | | | |_____________________________________________________|| | | | | AF_AX25 | AF_NETROM | AF_ROSE | AF_INET || | | |___________|_____________|_____________|_____________|___________|| | |Kernel | Protocols | AX.25 | NetRom | ROSE | IP/TCP/UDP|| | | |___________|_____________|_____________|_____________|___________||______________| | | Devices | ax0,ax1 | nr0,nr1 | rose0,rose1 | eth0,ppp0 || sm0,sm1 | | |___________|_____________|_____________|_____________|___________||______________| | | Drivers | Kiss PI2 PacketTwin SCC BPQ | slip ppp || ALSA OSS | | | | Soundmodem(*) Baycom | ethernet || Kiss | |_________|___________|_________________________________________|___________||______________| |Hardware | PI2 Card, PacketTwin Card, SCC card, Serial port, Ethernet Card || Sound Card | |_________|_________________________________________________________________||______________| |
This diagram attempts to show the relationship between the bits of software in the kernel and in user-mode, the devices, drivers and their hardware. Things in this diagram are - on the whole - dependant on things underneath them so configuration should be from the bottom up.
(*) This diagram was lifted from the original AX.25-HOWTO and at that time the Soundmodem was kernel code. This has since changed and modern 2.6 kernel no longer include this code, as I understand it the original code operated directly on the sound card hardware like a custom driver and as such was only compatable with certain cards. The new Soundmodem is a user-mode application that interfaces to the sound device via ALSA or OSS. The practical upshot of all this is that it now runs as an application which can create a modem from any Linux kernel supported sound card. I have attempted to graft on to the side of the diagram a section representing the new Soundmodem.
We shall step through the setup of a system in the order I did, this may not be the best way of doing things, more of a 'it worked for me'...
I'm using a Fedora Core 6 install, this is very similar to other Fedora Core releases and most Redhat releases although older distributions may require library version updates or other funnys. At install time the only really important choice is to install the development tools, 9 times out of 10 you'll need to compile some software at one time or another so it's best to have the stuff there to start with. If you installed without such things then Core 6 users will be able to install the development tools using that nice new Add/Remove Software option at the bottom of the Applications menu, FC4 or FC5 users may want to use yum to install the required packages, gcc et-al.
One other note about Fedora Core; I've always disabled SELinux at install time to keep my life slightly quieter. I should probably look into it at some time but if you do enable or have enabled it you're on your own for changes you'll have to make to allow things to work. My advice, turn it on and learn all about it. What I do, leave it off for now and when I'm happy with how things should work I'll try not breaking them with SELinux turned on!
The kernel that came with your distribution probably didn't come with AX.25 compiled in, it may have been compiled as modules, it may not. I have heard that some distributions do come with AX.25 'out of the box' but I'll assume that you want to update to the latest kernel and have AX.25 compiled in.
Wander over to www.kernel.org and see what the latest stable version of the Linux kernel is. At time of writing it was 2.6.19.1, if you click on the 'F' just after the date you will get a link to download the full kernel source. The file you're looking for is about 40Mb or so, being fairly sizable you should really find a local mirror to download from. Look at the mirrors list and choose your country. I am in the UK so tend to use the UK Mirror Service servers, following the link to /pub/linux then kernel/v2.6/ then pick the correct file. If the version is 2.6.19.1 then the file you're looking for is linux-2.6.19.1.tar.bz2 download this file to your PC.
| # wget ftp://ftp.ukms.lkams.kernel.org/pub/linux/kernel/v2.6/linux-2.6.19.1.tar.bz2 |
Ok you could just click on the file in the browser, I'm going to provide all ops as command line wherever possible to try and be as unambiguous as I can.
Move the file you just downloaded to /usr/src/kernels/ (you'll probably need to be root for this)
| # mv linux-2.6.19.1.tar.bz2 /usr/src/kernels/. |
Change to the kernels directory and uncompress the file
| # cd /usr/src/kernels # tar xjf linux-2.6.19.1.tar.bz2 |
If you're strapped for disk space at this point then you can now delete the .tar.bz2 file but as you're gonna need about 1.5Gig of disk space depending on your kernel choices for compilation an extra 40Mb hopefully shouldn't be stretching you.
With the file uncompressed a folder should have appeared with the same name as the file (minus the .tar.bz2), the last step is to symlink this folder to be accessible from /usr/src/linux
| # cd /usr/src # ln kernels/linux-2.6.19.1 linux -s |
If you now look in the /usr/src/linux 'folder' you should see lots of folders and a few files which contain the source code for the kernel. Your sources are now installed ready for configuring and compiling.
If you've not chosen kernel options from scratch before you probably want to start with your current kernel config and work from there. So first of all let's find your current config file.
Start by finding out what exactly you're running
| # uname -r |
This command will return the kernel release you are running at the moment, on a fresh Fedora Core 6 release this will probably print '2.6.18-1.2798.fc6'. On Fedora Core systems have a look in the /boot directory for files starting 'config-', now if your kernel release is as above then you're looking for config-2.6.18-1.2798.fc6. This file lists all the options selected to generate the kernel you're running therefore is a good starting point. Before someone points it out yes I know it's not a vanilla kernel and it's patched but the config file is good enough to get us started.
Let's copy that config file into the source folder and name it .config (a hidden file)
| # cp /boot/config-2.6.18-1.1798.fc6 /usr/src/linux/.config |
Now we get to configure the kernel, in the following command, menuconfig can be replaced with other options all detailed in the README file, the only ones other than menuconfig I'd suggest are gconfig or xconfig, these run under a graphical interface with lots of mousing and clicking to get what you want.
| # cd /usr/src/linux # make menuconfig |
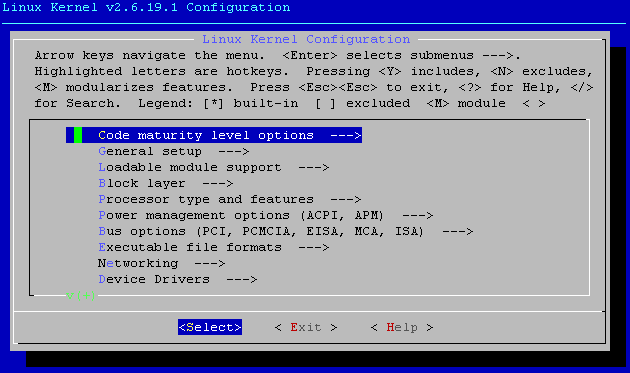
You should now be presented with a screen like this:
As it mentions at the top of the screen, Cursor keys, Enter and double taps of Escape get you around. As well as Y, N and M for choosing options, the Spacebar cycles between available options as not all options are available for everything, several sections also depend on others. Although you're welcome to customise things at this point I recommend making minimal changes at one time, that way if something breaks you have a fair idea what caused it.
For now, just scroll down to Networking and tap Enter to bring up this menu:
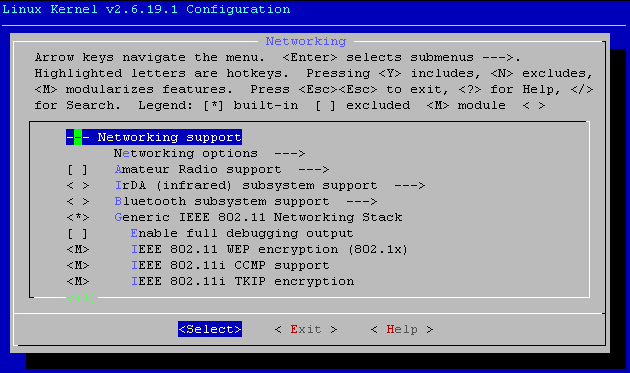
Scroll down to Amateur Radio support and tap the Space bar or Y to put a '*' in the brackets, this means the feature will be compiled into the kernel. The ---> means that there are more options underneath so press Enter to see them.
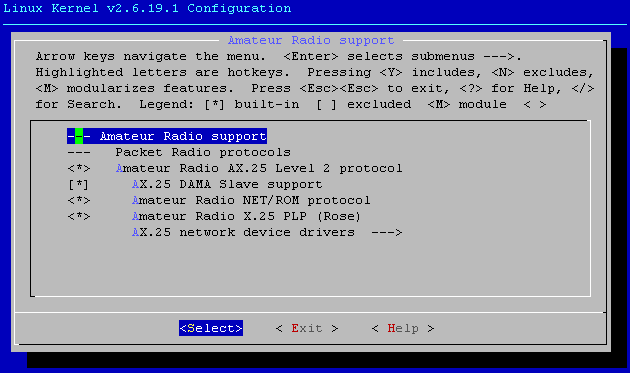
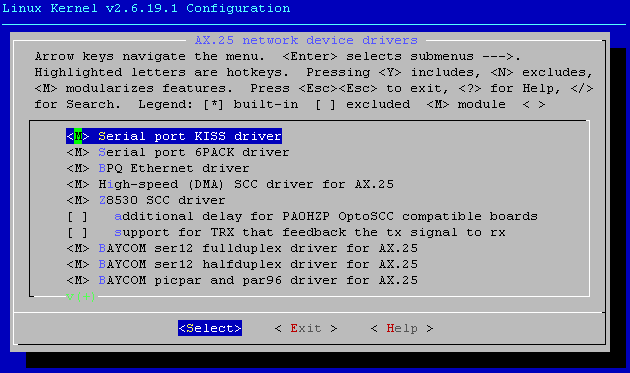
Here is a shot of the Amateur Radio menu with AX.25 enabled, You should only need the AX.25 Level 2 protocol enabled to get going but I've compiled in everything so I can play about with all the bits. Looking in the AX.25 network device drivers you only really need to compile drivers for any hardware TNC's you have. If you are not sure what you need or might want to plug one in in future then just set them all to <M> and they will be compiled as modules that can be loaded if needed.
If you're going to use the Soundmodem software then you will need the slightly misleadingly named Serial port KISS driver, its not just for serial port devices! It can either be compiled as a module <M> or compiled into the kernel <*>. Currently I have only tested it as a module.
When you are happy with your configuration exit by double tapping Escape (or choosing the Exit button) until you are asked if you wish to save your new kernel configuration, choose Yes and your kernel is now ready to compile
Compiling the kernel is dead easy, make sure you are still in the /usr/src/linux folder (you will be if you just exited the configuration) and type make!
| # make |
Lots and lots of text will roll along the screen and depending on the speed of your machine and your chosen configuration this could take a while. On a 1GHz PIII with 512Mb RAM you're looking at about half an hour to an hour, obviously quicker machines will be faster. Hopefully the compile should complete without stopping at any errors. You should eventually end up with a prompt and the text on the screen should all be happy stuff with no error messages (warnings are ok).
Now we just need to install the modules and the kernel to the right place on the system and add the kernel to the grub boot menu:
| # make modules_install install |
This should only take a few minutes while it copies some files, everything you chose to be compiled as a module at configure time ends up as a .ko file that has to be copied onto the system. The last stage is running a little install script that copies the kernel to the /boot partition.
Now when you reboot the grub menu at startup will contain two options, the original kernel and your new one. The default is to boot your old one, this is so that even if your system is configured to hide the boot menu and you install a new kernel that dosn't work you will still be able to boot.
When you're happy your new kernel works you can set it to be the default by editing /boot/grub/grub.conf
# grub.conf generated by anaconda
#
# Note that you do not have to rerun grub after making changes to this file
# NOTICE: You have a /boot partition. This means that
# all kernel and initrd paths are relative to /boot/, eg.
# root (hd0,4)
# kernel /vmlinuz-version ro root=/dev/aprsSys/aprsRoot
# initrd /initrd-version.img
#boot=/dev/hda
default=0 timeout=5 splashimage=(hd0,4)/grub/splash.xpm.gz hiddenmenu title Fedora Core (2.6.19.1) root (hd0,4) kernel /vmlinuz-2.6.19.1 ro root=/dev/aprsSys/aprsRoot rhgb quiet initrd /initrd-2.6.19.1.img title Fedora Core (2.6.18-1.2798.fc6) root (hd0,4) kernel /vmlinuz-2.6.18-1.2798.fc6 ro root=/dev/aprsSys/aprsRoot rhgb quiet initrd /initrd-2.6.18-1.2798.fc6.img |
This is roughly the sort of file you'll end up with at this point, the line 'default=0' highlighted in bold red will probably read 'default=1' on your system, this line tells grub which kernel out of the list below to run unless you choose another one from the menu at boot time, entries start at zero so in this file the kernel 2.6.19.1 is number 0 and the 2.6.18-1.2798.fc6 is number 1.
If you find there's not enough time for you to catch the boot menu at startup then adjust the value of timeout. The value is time in seconds that the grub splash screen will appear for, on fast booting systems you may want a larger value as the screen may disappear before the monitor turns on! Alternatively if you're happy and want to speed up boot times then you could turn it right down to 1, be warned though, you can set the value to zero which doesn't show the menu option at all but makes it slightly more work to recover if you break your default kernel.
When rebooted you can do a quick and easy check that you are running your new kernel by running uname -r and make sure it returns 2.6.19.1 or whatever version of the kernel you were attempting to install.
| # uname -r |
If the right number comes back then all should be good.
http://sourceforge.net/projects/ax25/
Three downloads are available from here, libax15, ax25-apps and ax25-tools
I had issues in trying to compile the ax25-tools and for my particular configuration I didn't seem to need any of them so if you're following this as a guide then ignore the tools for the time being.
I use the Kent mirror for sourceforge downloads so I started by downloading the libax25 package.
| # wget http://kent.dl.sourceforge.net/sourceforge/ax25/libax25-0.0.11.tar.gz |
With the file downloaded, untar/gzip it and move into the directory it unpacks
| # tar xzf libax25-0.0.11.tar.gz # cd libax25-0.0.11 |
If you read the INSTALL file it suggests a configuration to put the files in the "normal" places. Following the suggestion, configure, compile, install the library and install some default configuration files to get you started.
| # ./configure --exec_prefix=/usr --sysconfdir=/etc --localstatedir=/var # make # make install # make installconf |
Next, download the ax25-apps package:
| # wget http://kent.dl.sourceforge.net/sourceforge/ax25/ax25-apps-0.0.6.tar.gz |
With the file downloaded, once again untar/gzip it and move into the directory it unpacks.
| # tar xzf ax25-apps-0.0.6.tar.gz # cd ax25-apps-0.0.6 |
Once again the INSTALL file gives suggestions on how to best proceed.
| # ./configure --exec_prefix=/usr --sysconfdir=/etc --localstatedir=/var # make # make install # make installconf |
Hopefully installation of those two items went without a hitch, now we'll do some configuration before moving to the next stage
The main configuration file at this stage is /etc/ax25/axports. This file defines the AX.25 ports to be made available on the system, the default file contains a few example lines.
Below is a suggested entry for axports that will setup a 1200 baud port for APRS use on 2 meters:
| # /etc/ax25/axports # # The format of this file is: # name callsign speed paclen window description # APRS GM0XXX-2 1200 255 2 144.800 MHz (1200 bps) |
APRS is simply an interface port name, you may see ax0, sm0, 1 or many other things used in various documentation, whatever you decide on you'll have to use it any time you configure some software to speak to this AX.25 interface so make it something easy to remember.
GM0XXX should be replaced with your call sign, the -2 is the suggested ssid for an Igate on 2 meters, really it's just a unique call sign identifier to easily identify traffic from this interface.
1200 is the baud rate, usually it would be 1200baud for APRS on 2M, HF usually runs at 300baud.
There are two other config files, /etc/ax25/rsports and /etc/ax25/nrports. These define rose and net/rom ports, even though you are unlikely to have issues I'd recommend commenting out the port definitions in those files just to be on the safe side.
http://www.baycom.org/~tom/ham/soundmodem/
These days the soundmodem is a user-mode program instead of a kernel component so all we have to do is download, install and configure. The sound modem is the clever bit of software that speaks to your sound card which is connected to your radio, toggles PTT via serial or parallel port and then speaks to the AX.25 port we just configured.
Before we start there are some bits of software that soundmodem relies on to work. This software is not installed by default in Fedora Core 6.
GTK+ and libxml development packages are needed, these are installed using yum which automatically resolves any dependencies they may have.
| # yum -y install gtk+-devel # yum -y install libxml-devel |
This should download and install all the bits we need to get the soundmodem installed.
Download the full source package from the website.
| # wget http://www.baycom.org/~tom/ham/soundmodem/soundmodem-0.10.tar.gz |
Next we uncompress the file we downloaded and move into the directory this created
| # tar xzf soundmodem-0.10.tar.gz # cd soundmodem-0.10.tar.gz |
Assuming we have all the dependencies we need installed this one should be quick and easy to configure, compile and install
| # ./configure # make # make install |
If you get any errors when running the configure script, try to find a package name for the component you're missing, then you can use yum to install it and re-try the configure, you may get issues on other Linux distributions which have their own idea of standard packages... :-)
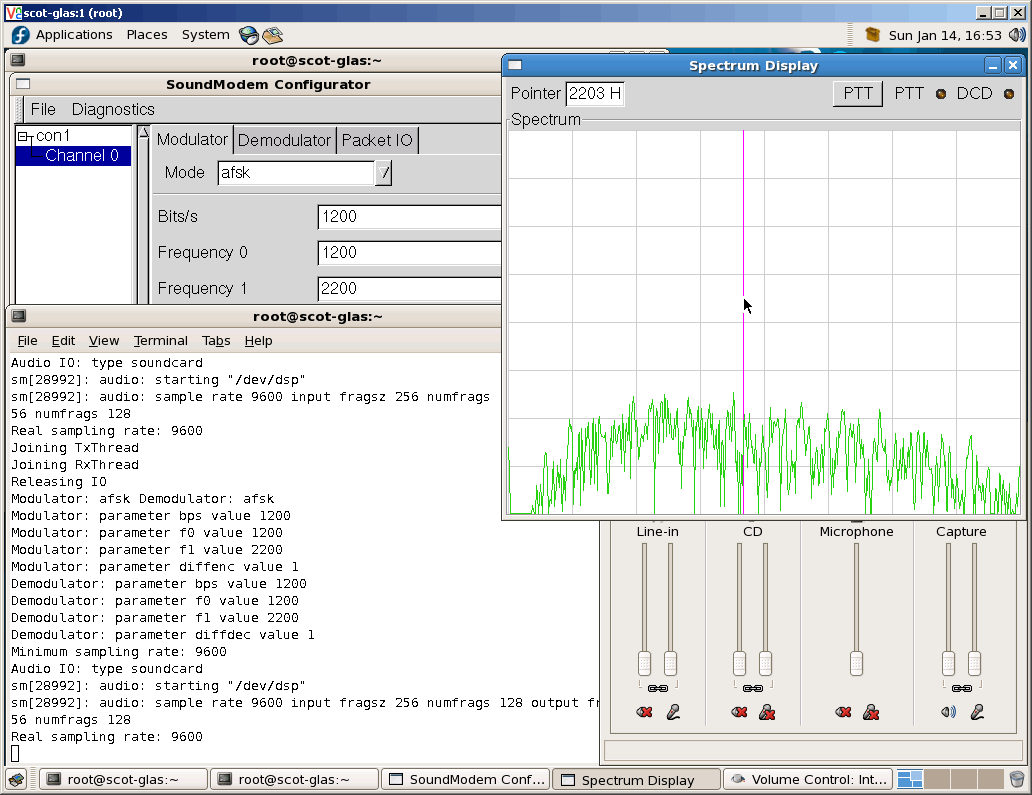
The configuration file is in /etc/ax25/soundmodem.conf and is laid out in XML format. You don't really need to look at it at all however as there is limited documentation as a graphical application is provided for configuration. Use of the graphical tool is recommended as it also supplies diagnostic tools such as an oscilloscope and spectrum analyser display to assist with level tuning.
From a terminal either within a graphical session or some other means run soundmodemconfig. Running so you can still see the terminal window is handy as it will display decoded packets on standard output.
| # soundmodemconfig |
To begin with you get a pretty bare window, start by adding a new configuration from the file menu. Don't worry too much about the configuration name, doesn't matter what it is.
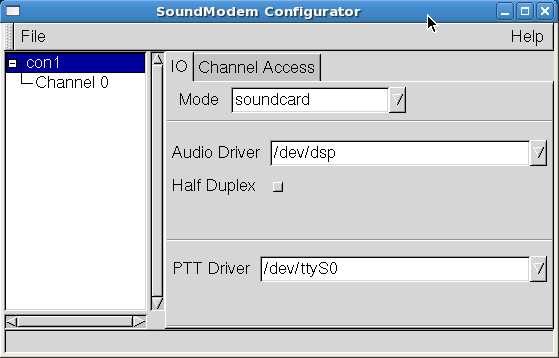
Now you will have tabs for IO and Channel Access. Channel Access contains settings related to the timing of packets and spacing, the defaults there should be fine to start with. On the IO tab (shown above start off in soundcard mode, if you're only working with RX you can leave the PTT driver as none but if you've made an interface for serial or parallel ports, just select the port here. For serial ports, RTS on = Transmit. For parallel ports I believe bit0 on = Transmit but I've not checked this for myself.
If you've a more involved audio setup, multiple sound devices, large multiport devices... you may be more interested in using the ALSA IO mode, you can then enter your ALSA device to be used.
Now you've setup a connection to the sound card, you can add a channel to run on that connection by going to the file menu again and adding a new channel.
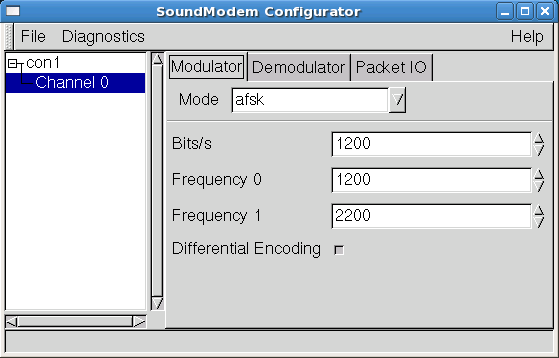
The first two tabs, Modulator and Demodulator allow you to set the mode, bit rate and frequencies for TX and RX, needless to say it helps if they are both the same. APRS is operated using AFSK (Audio Frequency Shift Keying) between the frequencies 1.2KHz and 2.2KHz.
The Packet IO tab deals with the connection to an AX.25 interface on the system.
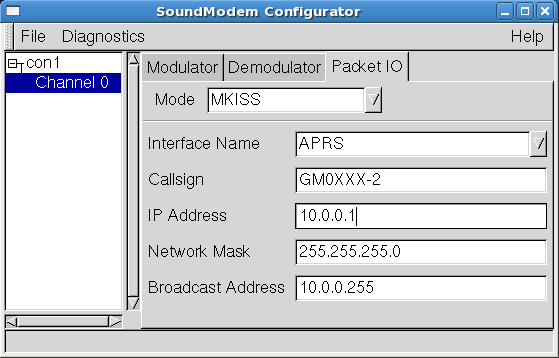
MKISS is the mode to be in, set you interface name to the same one you set in /etc/ax25/axports (APRS) if you followed this example Call sign once again should be yours with the number on the end matching what you set in axports. The IP information doesn't matter too much at this stage unless you're looking to run IP over AX.25 but if you are you should really look at being assigned a 44.xxx.xxx.xxx address by your local IP coordinator. If you're running several systems or with other people try however to maintain different addresses.
The config file is updated with every change you make so as soon as you close the GUI your settings will have been saved.
Pictures in this section link to full screenshots!
When you've selected a channel in the sound modem GUI a diagnostic menu appears, from here you can choose to run a 'scope, frequency analyser/spectrum display or some other modem test bits. The 'scope is quite handy to check that your input volume levels are not too high that you are overdriving the input (flat tops to waveforms). However for really looking at what's going on the spectrum display is the business.
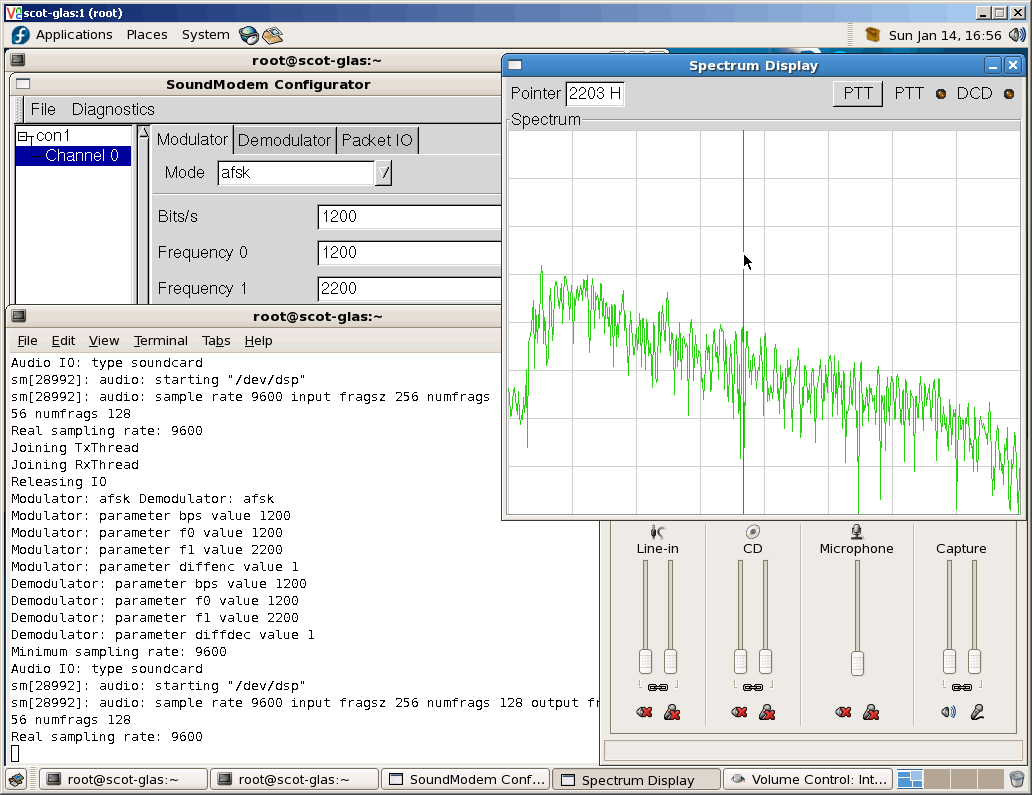
This image is the output of background noise from the speaker output of an Icom IC-3220E set. The X bars are spaced at 600Hz. The effect of the de-emphasis filter is clearly visible here, this is not usually a problem from sets with data/TNC connectors which have an unmolested audio output. Clearly there is quite an output level difference between 1.2KHz and 2.2KHz signals, whilst not a problem for voice it can create problems for packet operation. Decoding tends to be more reliable when the two frequencies used for encoding are received at roughly the same levels.
To this end a simple 2 stage RC filter was inserted between the audio output from the set and the input to the sound card, details can be found on this page. Below is an image of similar noise with the filter in place:
Although there is some attenuation even at the higher end this is quite acceptable as you may notice that the audio input levels are minimal with a reasonable audio output volume from the radio. Certainly the filter has attenuated quite heavily frequencies under 800Hz but the 1-2KHz area has been levelled out considerably. It could be better still if it was tuned to a specific radio supplied with a good wide band noise source, you could even go to the effort of making a 2nd or 3rd order active filter, even a pair of pass band filters with adjustable gains but it's really not worth that much effort IMHO.
Below is a shot of an incoming packet from a TinyTrack 3, this is a nice illustration of the Carrier Detect by soundmodem, the squelch gate is wide open at all times and only when packet tones are received does the soundmodem decide there's data floating around. This means that you don't have to worry about setting squelch levels to stop your setup transmitting over other stations.
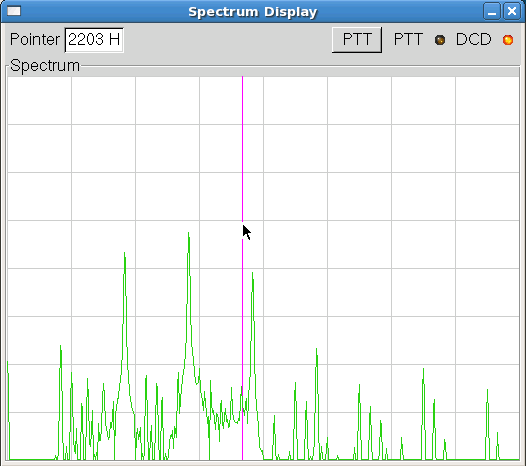
The three main peaks are the main power of the signal, the left is the 1200Hz tone and the right is the 2200Hz one, there is a fair bit of power in between from the shifting between the two tones. The output tones of the TinyTrack 3 are perfect when one is sent at a time but when transmitting data they drift a few Hz out from the centre, it is however detected and decoded quite happily (click the image for a full screen shot, look to the terminal window on the left to see the decoded packet. The 2200Hz tone is still a little lower than the 1200Hz one, partly this is due to fluctuations and when I happened to grab the screen, partly because they are not fully equalised by the filter but they're much closer than they would be without.
The other thing you notice in this image is quite a bit of harmonic output, mostly this is due to the TinyTrack again. At lower signal strengths this is less noticeable but you will probably hear the difference between a TinyTrack and a Software/Hardware TNC as rough or harsh sounding waveforms rather than smooth tones. This is not down to any errors as such, it's just a product of the way waveforms are created using very simple A-D circuitry which results in quite a stepped waveform. Perfectionists might want to add a low pass filter to the TinyTrack output to cut off the edges above 2.2KHz or so but it's not really necessary and goes against the minimal size design, it just goes to show how flexible the packet radio is to work with lots of different hardware.
If you're just running soundmodem short term as an application then just executing soundmodem in a terminal is quite suitable for use. If however you're looking at running a server and just want soundmodem to run quietly in the background you might want to setup a service, I've prepared a file to put in /etc/init.d that allows such operation. On a Fedora Core/Redhat system just save the soundmodem service file into /etc/init.d and make it executable, you might have to edit file locations if you've not installed things in the same place as me. Fedora Core releases previous to 5 don't like my service file either. Run chkconfig to add the file to the service list and then pick the run levels you want it to start in. You can then use service soundmodem [start|stop|restart] to control the service.
| # cd /etc/init.d # wget http://graham.auld.me.uk/projects/aprs/linux/soundmodem # chmod 775 soundmodem # chkconfig --add soundmodem # chkconfig --level 345 soundmodem on # service soundmodem start |
Now you should have soundmodem running in the background and it should come up on it's own on the next reboot!
Xastir is APRS client software on steroids, not only does it do all the usual stuff, plotting positions of others on a map, reporting your position from GPS; it supports (via included converter scripts) maps from most other APRS clients, including the popular Windows client UI-View32. Even some areas with online sat image coverage maps can be automatically downloaded. It talks to almost any radio or server interface, AX.25, serial TNC's direct, networked AGWPE, internet servers. It will operate as not only a client but a digipeater and Igate as well making it quite flexible.
There's a good comparison chart of APRS kit & software here: http://www.eskimo.com/~archer/aprs_capabilities.html
For all other Xastir related info have a look at the website: http://www.xastir.org/
I'll keep this one brief.
You need the lesstif-devel package for Motif support to build Xastir,
ImageMagick also adds support for many map image file types.
There are many other packages that will add even more capability but you can try
these at your leisure.
| # yum -y install lesstif-devel # yum -y install ImageMagick-devel |
Next I downloaded the stable source release from the SourceForge site. Uncompressed, and ran the configure script.
| # wget http://kent.dl.sourceforge.net/sourceforge/xastir/xastir-1.8.4.tar.gz # tar xzf xastir-1.8.4.tar.gz # cd xastir-1.8.4 # ./configure [snip lots of output] xastir 1.8.4 has been configured to use the following |
The last stage of the configure script outputs what libraries and other bits it's found and is going to compile with support for. The one's marked 'yes' in my list are really minimal for properly using the software. The one exception is Festival, this one is a speech library which will allow software to speak to you with a computer generated voice. It's only there because it was installed on my FC6 system by default, since I'm proposing using the soundcard as a packet modem it's not really going to be very useful but for other setups it could be quite handy.
Assuming all is well at this point, all that remains is to compile and install
| # make # make install |
The maps included are links to online things like sat imagery and other bits
but most of it is only any good in the USA. The maps folder is found at
/usr/local/share/xastir/maps/.
To get you started in Europe have a look at
http://www.pi8rwd.nl/aprs/, here are a few zip files of Xastir maps. Myself
in the UK for example downloaded and unzipped the UK maps.
| # cd /usr/local/share/xastir/maps/ # wget http://www.pi8rwd.nl/aprs/uk.zip # unzip uk.zip |
New maps are indexed when you start Xastir, there is a menu option to index new maps while running though in the maps menu.
Quick note before I forget, chmod 4775 /usr/local/bin/xastir to setuid if you are using an AX25 interfaced TNC
There's loads of documentation on the Xastir site so I won't say much other than a few trip warnings:
Only other thing I'll say is remember to setup your station properties in File->Configure->Station first before connecting, enjoy!
The javAPRSSrvr is the production of Pete Loveall AE5PL, there is a some info about it at http://www.aprs-is.net/javAPRSSrvr/.
I was looking originally at aprsd for a Linux APRS server but aprsd only really expects to communicate with a serial port TNC and playing with soundmodem in KISS mode and making KISS ports to the AX.25 port I still had real difficulty getting anything working. I did get one packet through but I think that was more luck than good management. Having noticed that the majority of servers on the APRS network not running aprsd were running javAPRSSrvr I had a closer look at it and found a neat diagram (pdf) which looked good to me; a server with an Igate, Digipeater and support for AX.25 interfaces. Not to mention AGWPE and a host of hardware TNC interfaces!
You'll need to E-mail Pete Loveall, AE5PL if you want a copy of javAPRSSrvr.
If like me when I started you are fairly fresh to java for anything other than javascript it may seem a little daunting but stick with it, it's not as bad as it looks!
My Fedora Core 6 install actually comes with the Free Software Foundation Java runtime which allows running .jar files (java programs). I did have a go with this initially and although it worked I had issues with the way the date was American by default, I managed to fix the day month issue with locale settings but although I could get rid of the AM/PM indicator the time stayed resolutely as a 12 hour clock not 24 hr GMT. Grr.
When running with the latest Sun Java the date and time were perfect 'out of the box'. Oh well I guess there was a reason the user guide suggested using the latest Sun Java ;-)
At time of writing the latest version was 1.6.0
I'd love to provide a link for a wget of the software but wget bombs out with a "filename/path too long error" probably due to the funny stuff they do to get you to agree to the licence before downloading.
Surf on over to http://java.sun.com you're after the Java SE (standard edition) JDK (java development kit) hopefully this is still at http://java.sun.com/javase/downloads/index.jsp I chose the latest and greatest JDK6 without EE or netbeans extras - whatever they are...
Click the download button and agree to something (email me if it said anything useful ;-) ) You'll get a list of options for various systems, under 32bit Linux I did try the RPM package but when trying to install it had issues with the already installed FSF java stuff. So the good old backup plan, get the plain file for Linux, for me it was called jdk-6-linux-i585.bin and came in at around 60Mb.
When I downloaded it I was only getting a pitiful couple of hundred K/sec download. (oh remember the bad old days of dial-up...) Maybe the servers were just busy Saturday afternoon, I must admit I didn't put much effort into looking for a local mirror, just let it get on and used the time to make a cuppa!
With the file safely on your machine you'll need to give it execute permissions as it's an unusual self extracting lump. Execute the file, tap q to get to the end of the licence agreement (or is that spacebar???), after agreeing a bunch of files will be extracted and inflated resulting in a folder called jdk1.6.0
| # chmod 775 jdk-6-linux-i586.bin # ./jdk-6-linux-i586.bin |
We'll put this folder into /usr/java and call it installed, more or less.
| # mkdir /usr/java # mv jdk1.6.0 /usr/java/. |
Just typing java will still run the FSF java, to run the Sun one you'll need to give a full path to /usr/java/jdk1.6.0/bin/java
If you really want you could either replace the FSF java with symlinks to the Sun one or even uninstall it and put the Sun JDK in it's place but I'm happy to have two available on my system.
Once you have access to the location to get the javAPRSSrvr you will be able to go into the Igate adjuncts/interfaces/ax25interface folder and download javax25.tar.gz (there's no direct link because you need a login session...)
Untar this file and there's a javax25 folder appears, in there find the libjavaax25.so file. This is the library and needs to go into the folder /usr/java/jdk1.6.0/jre/lib/i386/ (for the installed Sun JDK to find it).
| # tar xzf javax25.tar.gz # cp javax25/libjavaax25.so /usr/java/jdk1.6.0/jre/lib/i386/. |
If you run into problems you may need to recompile this on your machine. For me on FC6 with the Sun JDK 1.6 it was all good. If you do need to re-compile have a look in the Makefile for where it's looking for the JDK. I'd just reccomend adding a symbolic link to the location it's looking in to where your JDK is, for example a symlink folder as /opt/jdk1.4.3 pointing to /usr/java/jdk1.6.0. I did this to try compiling and it worked a treat. All you need is to run make in the folder and it should generate a new libjavaax25.so file for your machine.
This part is really quite painless, make a directory somewhere to install the server, download the combjar.zip file to that folder, unzip the file, insert a config file to get yourself started and away you go.
| # mkdir /opt/javaprssrvr # cd /opt/javaprssrvr # wget <url to combjar.zip> (or download to this location with firefox or something) # unzip combjar.zip # cp /location/of/config/file/javaaprssrvr.cfg . |
If you ask nicely I suspect the author may E-mail you a configuration file to help you get started, if you're really stuck you can have a look at one of my config files to see how things probably shouldn't be done at all...
I will mention one setting the file: 'isBackground' - When set to true and you run the software from a terminal you get no real output to speak of, I spent nearly half a day with the software working and me thinking it wasn't running because I was tripped up by this! Setting to false means some output when you start the server and logging in (pressing Enter by default) on the window you started the server from, gives you a console to control the server with!
Other things about the config:
Finally, start the server like this:
| # /usr/java/jdk1.6.0/bin/java -server -jar javAPRSSrvr.jar |
I made a little shell script called sunstart.sh, shown below to make life a little easier, save it in your /opt/javaprssrvr directory and run it to start the server
Point your wibble browser at http://localhost:14501 and hopefully you should find a server status page!
| #!/bin/sh echo "Remember to start soundmodem!" |
Like soundmodem though, I want to be able to start this server as a service in the background at boottime, enter another file to go in your /etc/init.d directory. This one's a little buggy in that to stop the 'service' it kills the java runtime rather than a specific PID or a java that's running javAPRSSrvr.jar so it's probably going to cause all kinds of trouble if let loose on a system where you use java for other things... (this service file won't work properly as is pre Fedora Core 5)
With the warnings issued you can download my javaprssrvr service file at your own risk, then similar to the soundmodem one, add it to your service list and tell it to start at boot time in run levels 3,4 & 5. Then manually start it now! (this works best if you've set isBackground to true in the config file)
| # cd /etc/init.d # wget http://graham.auld.me.uk/projects/aprs/linux/javaprssrvr # chmod 775 soundmodem # chkconfig --add javaprssrvr # chkconfig --level 345 javaprssrvr on # service javaprssrvr start |
Now your server should be up and running currently and on future reboots :-) Enjoy!
If you've any questions then just pop an email off to me at aprs(at)graham.auld.me.uk and I'll see what I can do to help.